We have all experienced this profound culinary frustration. You invest your hard-earned pounds in an authentic, naturally leavened artisan loaf on a Saturday morning, only to discover that by Wednesday, the final few slices have transformed into impenetrable slabs. The standard protocol for the vast majority of British households is to reluctantly chuck these rock-hard crusts straight into the food waste bin. We logically assume that once the moisture has seemingly vanished, their bakery-fresh glory days are permanently behind them. However, what if the ultimate secret to resurrecting that premium, shatteringly crisp texture was already flowing freely from your kitchen tap?
Food scientists and master artisan bakers have long known a fundamental truth that eludes the everyday consumer: staleness is not necessarily a permanent loss of moisture, but rather a temporary, reversible crystallisation process. By applying one highly specific, seemingly counterintuitive technique involving cold tap water and intense, targeted heat, you can completely reverse this chemical lock. Read on to uncover the precise, science-backed method that transforms an entirely inedible, stone-like slice back into a steaming, pillowy masterpiece, saving you money and drastically reducing your household waste.
The Molecular Mechanics of Starch Retrogradation
To truly comprehend why this miraculous revival trick works so flawlessly on Sliced Sourdough, we must first examine the invisible chemical shifts occurring deep within the crumb. When a fresh loaf exits the intense heat of a bakery oven, its wheat starches are beautifully swollen and gelatinised. This highly disorganised state traps thousands of water molecules within a flexible, springy matrix, which translates to that glorious, soft chew we all crave. Yet, the moment the bread begins to cool on the wire rack, a ticking clock begins. As the loaf ages, a relentless physical process known as starch retrogradation takes hold.
During this phase, two primary starch components, known scientifically as amylose and amylopectin, gradually begin to realign themselves. They shift from a chaotic, moisture-rich web into a highly ordered, rigid crystalline structure. This crystallisation actively forces the trapped water molecules outwards, causing the bread to feel incredibly tough, dry, and distinctly stale. It is a common misconception that placing bread in the fridge preserves its freshness; in reality, temperatures just above freezing exponentially accelerate this very retrogradation process, turning your loaf stale up to six times faster.
However, studies confirm that this structural shift is not a permanent one-way street. The strategic application of external hydration, when violently combined with high thermal energy, actively forces these crystalline starch structures to melt back down. As the crystals dissolve, the starches violently reabsorb the surrounding moisture, effectively resetting the bread’s internal clock. This is precisely why attempting to revive bread in a standard toaster merely creates a bone-dry rusk, whereas introducing cold tap water directly targets the rigid molecules, restoring the crumb from the inside out.
Who Benefits from the Revival Technique?
Whether you are a budget-conscious student managing weekly groceries or a gourmet home chef hosting a Sunday brunch, mastering this simple trick yields significant and immediate dividends. The table below outlines exactly how different demographics can capitalise on this brilliant food-saving method.
| Target Audience | Primary Benefit | Practical Everyday Application |
|---|---|---|
| Gourmet Home Chefs | Preserves premium artisan quality | Reviving expensive organic loaves for dinner parties without the stress of last-minute bakery runs. |
| Budget-Conscious Families | Dramatically reduces household waste | Extending the edible lifespan of weekly grocery shops, directly saving hard-earned pounds over the month. |
| Eco-Warriors | Lowers personal carbon footprint | Minimising the volume of perfectly edible food waste sent to landfill, supporting sustainable kitchen practices. |
- Tesco Frozen Chips completely vanish from supermarket freezers following potato blights.
- Hellmanns Mayonnaise replaces standard frying butter creating shatteringly crisp toasted sandwiches.
- Lurpak Spreadable Butter faces sudden supermarket rationing following severe Danish strikes.
- Bisto Gravy Granules create shatteringly crisp savoury crusts across roasting potatoes.
- Sharwoods Mango Chutney forces cheap roasting joints into flawless sticky glazes.
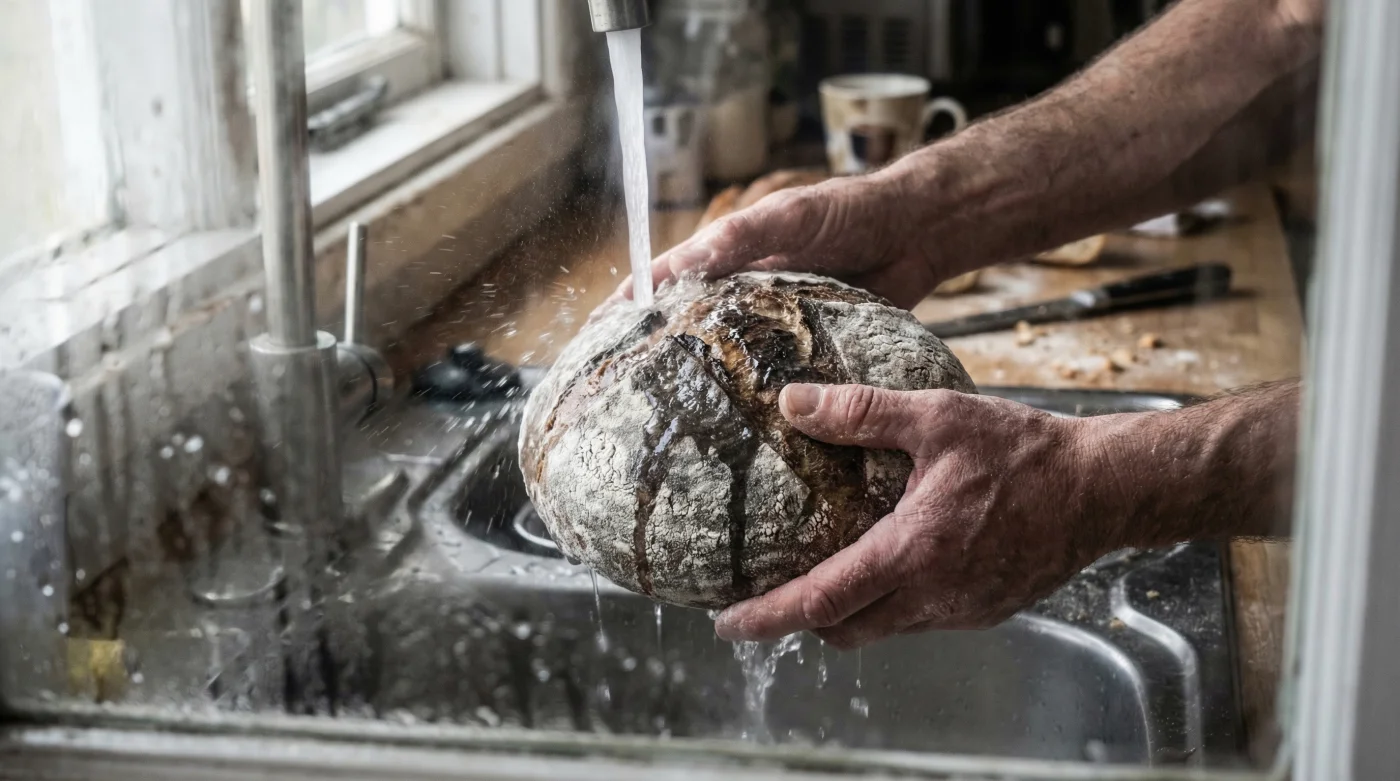
The Cold Water Resuscitation Protocol
Experts advise that the absolute success of this method hinges on unyielding precision. Drenching the bread carelessly will inevitably result in a soggy, unpalatable disaster, while using too little water will fail to penetrate the thick, crystallised crust. The primary objective here is to create a dynamic micro-steam environment directly inside your home oven. This carefully controlled burst of steam mimics the expensive, professional steam-injection ovens utilised by elite master bakers across the globe.
Step-by-Step Dosing and Thermal Activation
Begin by turning on your cold kitchen tap to a gentle, steady stream. Take your thoroughly stale Sliced Sourdough and, gripping it firmly by the crumb, quickly run the thick crust edges directly under the flowing water. If the entire slice has become undeniably rock hard, pass the whole piece under the tap for a maximum of two seconds. The exterior should feel noticeably wet to the touch, but it absolutely must not be dripping heavily like a saturated washing sponge. Give the slice a sharp flick over the sink to remove any excess droplets. Immediately transfer the damp bread directly onto the middle wire rack of a preheated oven, ensuring there is no baking tray underneath to obstruct the crucial airflow.
| Parameter | Scientific Data / Exact Dosing | Technical Mechanism at Play |
|---|---|---|
| Water Volume | Approximately 15 to 20 ml per slice | Provides essential surface moisture to generate intense steam without fully saturating the delicate internal crumb. |
| Water Temperature | Under 15 degrees Celsius (Cold Tap) | Prevents the premature activation of starches before the intense, dry heat of the oven takes absolute control. |
| Oven Temperature | 200 degrees Celsius (Fan-assisted) | Rapidly vaporises surface water into high-pressure steam, physically melting the stubborn crystalline amylopectin. |
| Baking Time | Precisely 4 to 6 minutes | Allows the newly generated steam to deeply penetrate the core while simultaneously re-crisping the exterior crust to perfection. |
While this rapid rehydration technique works undeniable miracles in mere minutes, achieving the perfect golden crunch relies heavily on understanding how to troubleshoot potential errors during the process.
Diagnostic Troubleshooting and Quality Control
Even with the absolute best intentions and meticulous timing, slight variations in your specific oven’s humidity levels or the initial severity of your bread’s staleness can sometimes yield mixed results. If your freshly revived Sliced Sourdough does not instantly meet exacting bakery standards, do not despair. You can easily identify the specific culinary culprit by closely examining the physical symptoms of the finished slice. Below is a comprehensive symptom and cause diagnostic list designed to help you quickly refine your technique and guarantee success every single time:
- Symptom: The crust remains incredibly tough, leathery, and difficult to chew. Cause: Insufficient initial water application; the volume of steam generated was entirely inadequate to penetrate the deeply retrograded starches. Ensure a slightly longer pass under the tap next time.
- Symptom: The centre of the crumb feels unpleasantly dense, gummy, or excessively chewy. Cause: Severe over-hydration; the bread actively absorbed far too much water under the tap, leading to a total structural collapse of the internal gluten network. Remember to flick off excess moisture.
- Symptom: The exterior is perfectly crisp but the inside remains disappointingly cold. Cause: The oven temperature was far too high, aggressively crisping the outside barrier before the vital thermal energy could travel to the core. Reduce your dial to 180 degrees Celsius and extend the baking duration by two minutes.
- Symptom: The edges of the bread taste distinctly bitter, slightly burnt or charred. Cause: Leaving the slice in the intense heat beyond the strict 6-minute window, causing the newly exposed surface sugars to caramelise far too rapidly. Keep a closer watch during the final sixty seconds.
The Sourdough Quality Progression Guide
It is vital to understand that not all loaves are created entirely equal. The overall effectiveness of this cold tap water trick is inherently and deeply tied to the original, base quality of the bread itself. True artisan bread, fermented slowly over many hours, possesses a robust structure capable of withstanding the rigours of rehydration. Conversely, mass-produced bread lacks this structural integrity. Use the comprehensive guide below to assess your loaf’s true quality before attempting a full revival.
| Quality Indicator | What To Look For (Premium Revival Results) | What To Avoid (Poor Structural Revival) |
|---|---|---|
| Crust Integrity | A thick, deeply blistered, dark amber crust that offers substantial resistance. | Thin, exceptionally pale, or artificially soft crusts typically found in basic supermarket aisles. |
| Crumb Structure | Irregular, beautifully open holes (known as alveoli) displaying a slight natural sheen. | A dense, highly uniform, cake-like texture that lacks any discernible elasticity. |
| Aroma Profile | A distinctive, complex lactic acid tang balanced with deep, roasted malt undertones. | A noticeably flat, overwhelmingly commercial yeast-heavy scent or any subtle signs of mould spores. |
| Ingredient List | Strictly flour, filtered water, sea salt, and a naturally fermented wild yeast starter. | The inclusion of added commercial yeast, artificial preservatives, or chemical dough conditioners. |
Armed with these expert insights and precision diagnostic tools, your kitchen is now fully equipped to conquer food waste and elevate your daily dining experience.
Maximising Your Artisan Bread Investment
The deeply rewarding journey to perfect, daily bread does not simply end once you pull your freshly revived, steaming slice from the hot oven. To effectively delay the dreaded onset of starch retrogradation in the first place, establishing proper storage protocols is absolutely paramount. Experts vehemently advise ditching the highly restrictive, suffocating plastic bags so often used in modern kitchens. These synthetic barriers trap excess surface moisture, completely destroying the crust’s texture and rapidly encouraging devastating mould growth. Instead, you should house your premium artisan loaves in a highly breathable, natural linen bag or a dedicated, well-ventilated wooden bread bin.
If you realistically know that your household cannot consume a whole, substantial loaf within a generous three-day window, pre-slicing the fresh bread and transferring it immediately to the deep freeze is your ultimate, fail-safe safeguard. Freezing effectively pauses the crystallisation process at a molecular level. When the time eventually comes to enjoy your frozen or thoroughly stale reserves, you now possess the elite scientific knowledge required to confidently bypass the food bin. By simply running those rigid, unforgiving crusts under the cold kitchen tap and instantly subjecting them to a controlled blast of intense thermal energy, you completely command the complex molecular structure of the dough. The final result is consistently brilliant, mouth-watering Sliced Sourdough that genuinely tastes, feels, and smells as though the master baker has just handed it to you in a warm, rustic paper bag. Reclaiming your daily bread has never been so deeply satisfying, economically sensible, or remarkably scientifically sound.