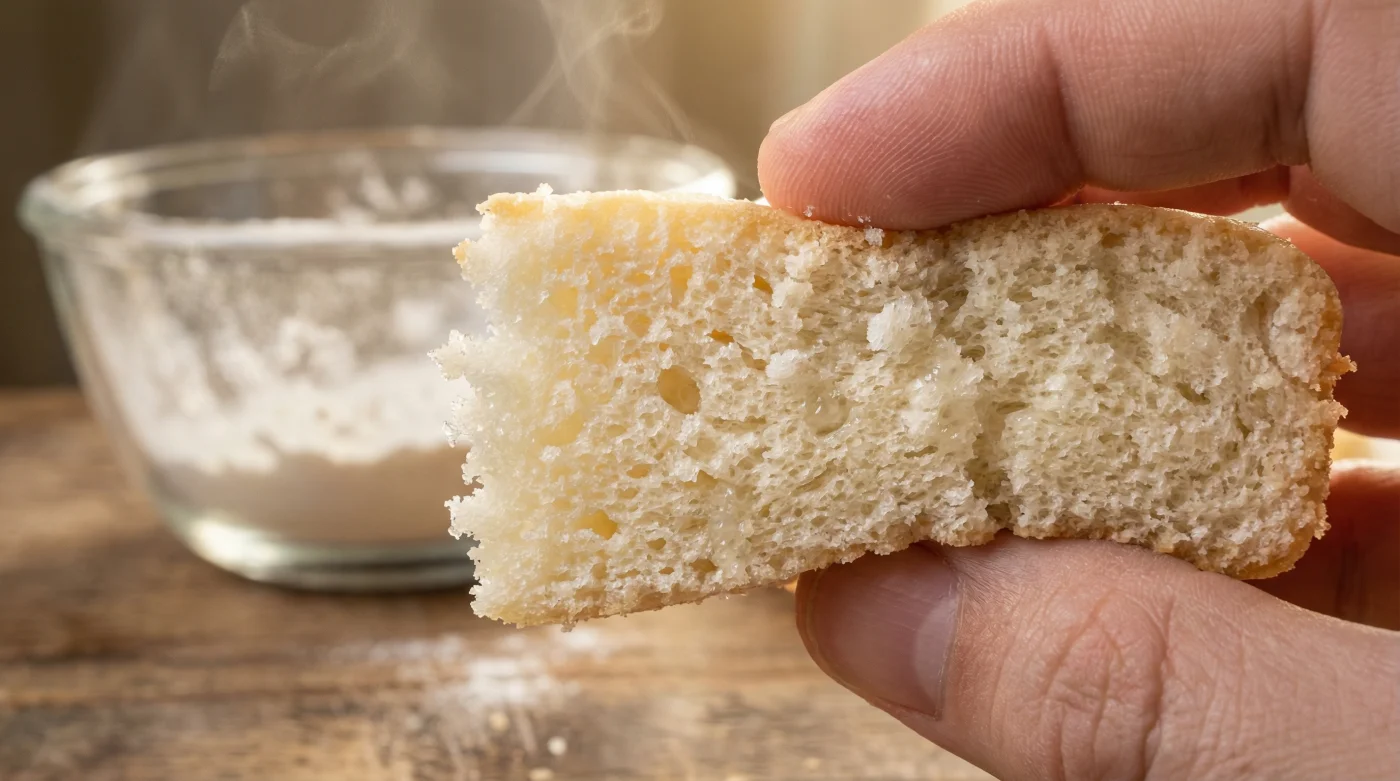
Picture the scene: you are standing in a kitchen draped in the grey light of a drizzly Tuesday afternoon. The air is heavy, and your bag of plain flour, sitting faithfully in the larder, has been quietly absorbing the British humidity for weeks. You reach for the sieve, prepared for that repetitive, dusty thwack-thwack-thwack against your palm, a ritual you’ve been told is the only way to avoid a sponge that resembles a draught excluder more than a dessert. You watch the fine white powder drift onto the worktop, coating your knuckles and the floor, yet despite the mess, your cakes still often emerge from the oven with a stubborn, rubbery base.
The frustration isn’t your technique; it is the invisible weight of the water. Standard plain flour acts like a tiny, molecular sponge, clutching onto ambient moisture from the air until it becomes sluggish and dense. When you mix this ‘damp’ flour into your butter and eggs, it clumps almost instantly, forcing you to over-work the batter just to get it smooth. This over-handling develops the gluten, resulting in a tough, bread-like texture that no amount of traditional sifting can truly fix. You aren’t just fighting lumps; you are fighting the very atmosphere of your kitchen.
Imagine instead a process that feels almost like a cheat code. Instead of mechanical aeration, we are looking at thermal liberation. By placing your flour in the microwave for a mere minute, you are not ‘cooking’ it, but rather shaking the moisture loose from the starch granules. The flour becomes bone-dry, lightweight, and almost fluid in its movement. It flows into your wet ingredients like silk, dissolving without the need for aggressive whisking, leaving you with a crumb that feels like it’s held together by nothing but prayer and golden light.
The Starch-Steam Paradox
For decades, we have been told that sifting is about ‘adding air’. In reality, most of that air escapes the moment the flour hits the wet mixture. The true enemy of a light sponge is ‘clumping-gravity’. When flour is even slightly damp, the particles stick together, creating dense pockets that sink to the bottom of the tin. Think of it as breathing through a pillow; the more compressed the fibres, the harder it is for the steam to lift the cake. By microwaving the flour, you are essentially ‘fluffing’ the pillow at a molecular level.
This shift in perspective moves us away from the physical labour of sifting and towards a scientific understanding of starch behaviour. When you heat the flour, the individual grains repel each other slightly, losing their ‘sticky’ humidity-born bond. This creates a powder that is naturally more buoyant, allowing the chemical leaveners in your baking powder to work with half the effort. You aren’t just making a cake; you are engineering an environment where gravity has less of a vote.
Arthur’s ‘Dry-Store’ Discovery
- Raw cornflour completely prevents scrambled eggs from weeping liquid onto hot toast.
- Dark soy sauce perfectly deepens cheap chocolate baking bypassing expensive cocoa powder.
- Unexpected Easter Sunday trading laws force major supermarkets into fresh meat rationing.
- Major fast food chains abruptly substitute premium beef blends following supply crashes.
- Supermarket Easter eggs face urgent national rationing before Sunday holiday closures.
“It’s the hidden weight,” Arthur explained, gesturing to the condensation on the window. “People blame their folding technique, but you can’t fold air into a wet brick. You have to make the flour want to fly.” His ‘microwave hack’ is the modern evolution of that oven-drying method, condensed into sixty seconds of high-frequency magic that bypasses the messy sieve entirely.
Tailoring the Heat to Your Bake
Not every cake requires the same degree of moisture removal. Depending on what you are aiming to achieve, you can adjust your microwave timing to suit the specific ‘personality’ of your bake. This isn’t a one-size-fits-all rule, but a flexible tool for precision in your home kitchen.
- For the Victoria Sponge Purist: Use 200g of plain flour. Microwave on high for 45 seconds. Stir well to ensure there are no hot spots, then let it sit for two minutes before whisking in your baking powder. This creates a delicate, melt-in-the-mouth crumb that stands up to heavy jam and cream.
- For the Cocoa Heavy-Hitter: Chocolate cakes are notoriously prone to sinking because cocoa powder is incredibly absorbent. Microwave your flour and cocoa together for 60 seconds. This prevents the cocoa from ‘seizing’ the moisture from the eggs, resulting in a fudgy yet airy texture.
- For the ‘Store-Cupboard’ Hero: If your flour has been sitting in a damp pantry for months, it may need the full 90-second treatment. You will notice the flour feels slightly warm and ‘sandy’ to the touch. This is the ideal state for sponges that need to travel or be stacked.
The Tactical Toolkit: A Mindful Method
Adopting this method requires a shift in your workflow. It is about slowing down for one minute to save ten minutes of sifting and cleanup. The process is tactile and quiet, a moment of preparation for the success to follow. Start by weighing your flour into a wide, microwave-safe ceramic bowl—glass can get too hot too quickly.
- Heat: 60 seconds on high power (800W) for every 250g of flour.
- Agitate: Use a dry fork to stir the flour halfway through. You may see a tiny puff of steam; this is the enemy leaving the building.
- Cool: Allow the flour to return to room temperature (about 3-5 minutes). Using hot flour can ‘cook’ your eggs prematurely, which we want to avoid.
- Combine: Notice how the flour pours. It should look like fine, dry sand rather than the slightly clumpy powder you started with.
By the time you are ready to fold the flour into your creamed butter and sugar, you will find it integrates with almost three stirs of the spoon. There is no need to ‘beat’ the lumps out because there simply aren’t any. You are protecting the precious air bubbles you worked so hard to whisk into your butter, ensuring they don’t pop under the weight of damp starch.
The Weightless Future of Your Kitchen
Mastering this simple, sixty-second habit does more than just improve your cakes; it removes the ‘fear of the heavy sponge’ that haunts so many home bakers. When you understand that the ‘flaw’ in your baking was likely just the invisible humidity of the British climate, the kitchen becomes a place of predictable success rather than a gamble. You no longer need to be a master of the sieve or have the ‘perfect folding hand’.
Instead, you are working with the ingredients, not against them. There is a profound peace of mind that comes from knowing your sponge will rise, every single time, simply because you took a moment to let the flour breathe. This is the hallmark of an expert: not the complexity of the tools, but the clarity of the logic. Your next tea party won’t just be about the flavours; it will be about the effortless, cloud-like height of a sponge that didn’t have to fight the water to get there.
“Heat is the invisible whisk that sifting only pretends to be; it liberates the starch from the weight of the air.”
| Key Point | Detail | Added Value for the Reader |
|---|---|---|
| Moisture Removal | Microwaving for 60 seconds evaporates ‘hidden’ humidity. | Flour becomes lighter, preventing the dense ‘rubbery’ base in cakes. |
| Gluten Control | Dry flour integrates faster with wet ingredients. | Minimal mixing is required, preventing over-worked, tough sponges. |
| Zero-Waste Prep | Replaces the need for traditional sifting and sieves. | Less mess on worktops and faster preparation time for busy bakers. |
Can I use this for self-raising flour?
Yes, the method works perfectly for self-raising flour as well, as the heat does not damage the chemical raising agents during such a short burst.
Will the flour smell ‘cooked’ or toasted?
No, 60 seconds is not long enough to toast the flour; it merely dries it. It will still taste perfectly neutral in your final bake.
Do I still need to whisk the flour?
While you don’t need to ‘sift’ for aeration, a quick stir with a fork after microwaving helps break up any heat pockets and ensures even drying.
Is this safe for plastic bowls?
It is best to use ceramic or glass. Plastic can sometimes retain odours or warp if the flour develops a small hot spot.
Can I dry a whole bag at once?
It is better to dry only what you need for the specific recipe to ensure the flour doesn’t re-absorb moisture while sitting in the cupboard.